

Using 辰汐ai in NextChat
NextChat (formerly ChatGPT-Next-Web) is an open-source AI client that can be deployed on Vercel, Cloudflare, or Docker. It supports custom OpenAI-compatible endpoints, so it can be connected to 辰汐ai. This article introduces the configuration process.
¶ Application Process
To connect 辰汐ai in NextChat, first go to the 辰汐ai Console, obtain your API Token, and keep it for later use.

If you have not logged in or registered yet, you will be automatically redirected to the login page to register and log in. After logging in or registering, you will automatically return to the current page.
Free credits are provided upon your first application, allowing you to try 辰汐ai's model services for free.
¶ Download NextChat
You can use the desktop version (download .exe / .dmg / AppImage from the Releases page), the online Web version, or deploy it yourself to Vercel / Cloudflare / Docker (see the advanced section below).
¶ Configure 辰汐ai
Start NextChat and go to Settings → Model Provider:
| Field | Value | Description |
|---|---|---|
| Model Provider | OpenAI |
Use the OpenAI-compatible protocol |
| OpenAI API Address | https://api.acedata.cloud |
Enter only the root domain, without /openai and without /v1 |
| API Key | Your 辰汐ai Token | The Token copied from the console |
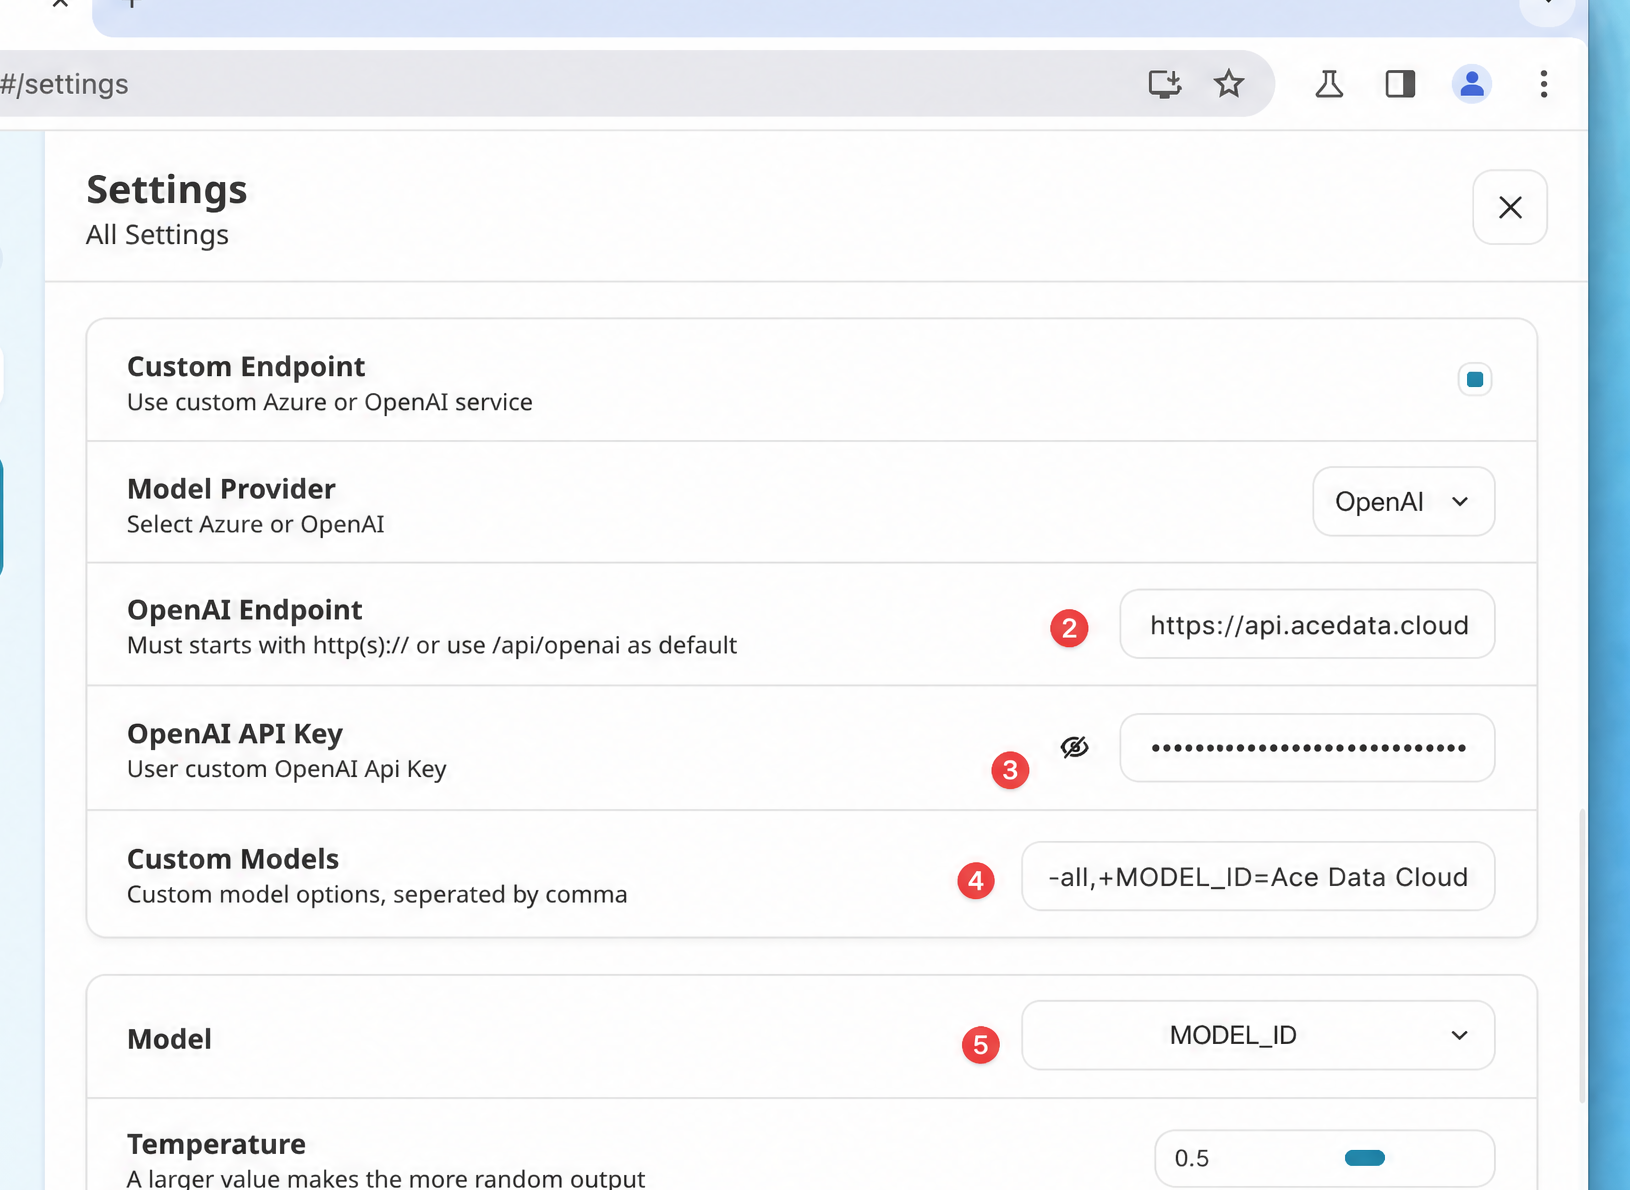
NextChat automatically appends /v1/chat/completions after the API address, so you only need to enter the root domain:
| API Address | Actual Request | Result |
|---|---|---|
https://api.acedata.cloud |
https://api.acedata.cloud/v1/chat/completions |
Correct |
https://api.acedata.cloud/openai |
https://api.acedata.cloud/openai/v1/chat/completions |
404 (there is no /v1 under /openai) |
https://api.acedata.cloud/openai/v1 |
https://api.acedata.cloud/openai/v1/v1/chat/completions |
404 |
In the "Custom Model Names" box, enter models separated by English commas. NextChat supports special syntax: +model_name to add, -model_name to hide, model_name=display_name to customize the display name, and -all to hide everything first. The cleanest recommended format is:
-all,+MODEL_ID=Display Name
¶ Select a Model
The model catalog is continuously updated. Prioritize using the model list automatically loaded by the client; when manual entry is needed, first request GET https://api.acedata.cloud/v1/models to obtain the current model IDs, then select according to the context, image, and tool-calling capabilities supported by the client.
¶ Verify the Integration
If you are not sure whether the issue is with NextChat or the network, you can first use curl to directly verify the endpoint (replace {token} with your Token):
curl -X POST 'https://api.acedata.cloud/v1/chat/completions' \
  -H 'Authorization: Bearer {token}' \
  -H 'Content-Type: application/json' \
  -d '{
    "model": "MODEL_ID",
    "messages": [{"role": "user", "content": "ping"}]
  }'
Returning an OpenAI-compatible chat.completion object indicates that both the Token and endpoint are ready; if HTTP 403 used_up is returned, it means the Token is valid but the balance is insufficient. You can recharge in the console.
¶ Advanced: One-Click Deployment to Your Own Domain
NextChat supports deploying an AI website of your own. Taking Docker as an example (replace {token} with your Token):
docker run -d \
  --name nextchat \
  -p 3000:3000 \
  -e OPENAI_API_KEY={token} \
  -e BASE_URL=https://api.acedata.cloud \
  -e CODE=your-password \
  -e CUSTOM_MODELS="-all,+MODEL_ID=Display Name" \
  yidadaa/chatgpt-next-web
When deploying with Vercel / Cloudflare, configure the same OPENAI_API_KEY, BASE_URL, CODE, and CUSTOM_MODELS in the project's environment variables. CODE supports multiple access passwords separated by English commas, making it convenient to track usage by person. For complete descriptions of the above environment variables (BASE_URL defaults to https://api.openai.com, and the +/-/=/-all/+all syntax of CUSTOM_MODELS), please refer to the official NextChat README.
¶ Frequently Asked Questions
¶ 404 Not Found Is Displayed
Usually, the API address was entered as .../openai or .../openai/v1. Change it to https://api.acedata.cloud and let NextChat append /v1/chat/completions itself.
¶ The Added Model Does Not Appear in the Model Dropdown
Check the CUSTOM_MODELS format: every model must have a + before it; if you used -all, make sure to add back the required models with + afterward.
¶ 401 Unauthorized Is Displayed
Please confirm that the API Key contains the 辰汐ai Token (without the Bearer prefix and without extra spaces), and that the balance of the associated application is sufficient.